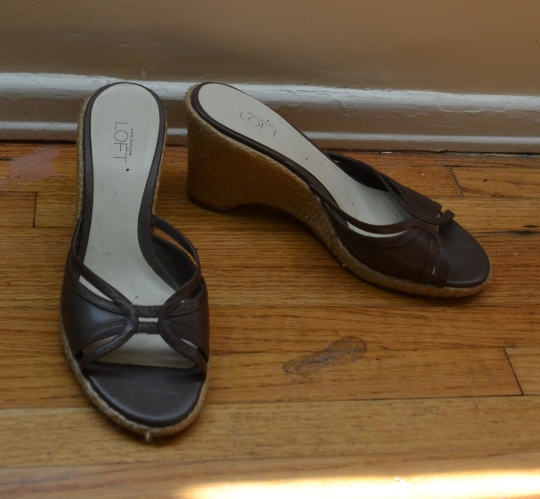
Here’s another pair of shoes I made over. I painted the platforms and heels. Because they were dark brown I painted them with a couple of coats of white before I painted the blue.
Another shoe-over
Shoe makeovers
I have been working on a project in which I am photographing all my clothes. It’s already a very helpful exercise because being able to see all my clothes at once has helped me identify items I am not wearing. When photographing my shoes I found a few pairs that I thought I would wear more if I did a bit of a makeover on them.
I bought these for a costume party several years ago.
These came from a thrift store and are from Ann Taylor.
I did some painting on both. You can find tutorials for this all over the web but the basic steps are to mask the areas you don’t want to paint with painter’s tape and do several coats. I used craft acrylic paints and a sponge brush so I wouldn’t have any bristle lines. I did a couple of coats the first day, let them dry overnight, and then another coat the next day. Then I gave everything a couple of coats of ModPodge. I didn’t want to go out and buy any new craft supplies for this project so I just used what I had on hand. This is what I ended up with:
The only problem I had was that on the shoes that were vinyl not leather I had issues with the painter’s tape peeling off some of the finish on the areas I was trying to keep paint-free. So peel the tape off carefully and have a back up plan in mind.
Baby project
My paternal grandmother, Mutsey, was quite a crafty lady. Like me, she was often working on a project while watching TV in the evenings. She made the sweetest embroidered pictures for myself and my brother and sister. Each one is different but this one is mine.
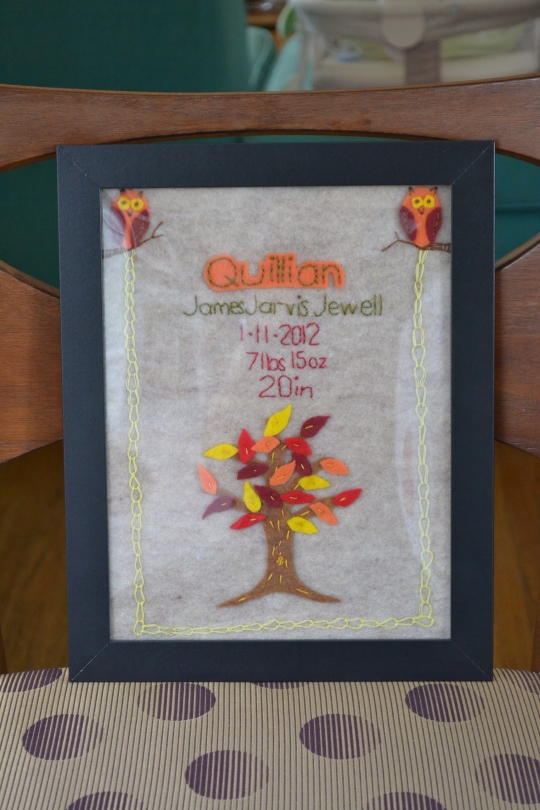
I decided to make something similar for my son. As anyone with a child knows, naps don’t last forever so I wanted to do something a bit faster and I used a combination of embroidery and felt.
 I started with the name and backed the first name in a felt outline cutout before I stitched on the name.
 I added the owls because I like them and also because owls have been a big design trend for kid’s things for the last year or so. I like it when design elements date themselves. It’s fun to look at pictures of yourself and say, “Oh, babydoll dresses and Doc Marten’s. Remember the early 90’s?”
The tree was a last minute addition. I couldn’t figure out what I wanted to put in the empty space after I did the rest of the picture and it sat around staring at me for a couple of days and then the tree just came to me. Ta-da! Baby picture!
So I have been a mom for 9 weeks now and surprisingly, it is not all sitting on the couch eating bon-bons. Although there is some stress chocolate involved in raising a child. I have been working on some ideas for blog posts and we’ll see if my little darling allows me to complete them but in the meantime here is the reason I have not been keeping up with my blog.
Bassinet fitted sheets
I purchased a bassinet for the baby from craigslist.com and it only came with one fitted sheet. I have been repeatedly assured by others with babies that we can expect “blow-outs” from diapers and that we should have extra sheets on hand for quick changes. A quick examination of the sheet that came with the bassinet showed the construction was pretty simple so I decided to make some extra sheets. I bought some yellow knit fabric and some cute patterned knit fabric from JoAnn’s. It was my lucky day because the fabric was half price and I only spent $12 for one yard of each fabric and some elastic for the edges. I priced fitted bassinet sheets at Babies R Us and the cost was $8.99 for one and $15.99 for two.
Making them was very simple. This works for a fairly flat bassinet mattress. Take the bassinet mattress and trace the outline on a large sheet of paper then cut it out and use it as a pattern to cut out the sheet top. Do not add any seam allowance, you want to have a tight sheet so the baby can’t wiggle it around and become entangled. If you are trying to get two sheets out of a yard as I did you may want to experiment with layout a bit before you begin cutting so that you leave as much leftover fabric as possible to cut the strips for the sides.Cut strips of fabric about 4 inches wide from the remainder of the fabric and sew the 4 inch ends together to form one long strip of each. Keep the right sides together!
If you have a serger, attach the long edge of the fabric to the outer edge of the top of the bassinet sheet, going all the way around the perimeter. If you do not have a serger you can use a standard sewing machine with a zig zag stitch. Keep close to the edge of the fabric. Sew the ends together when they meet.
I did not insert elastic all the way around, as you can see from this picture.
I stitched the elastic down at the starting point.
Then put a safety pin in the other end of the elastic.
After that I sewed a casing around the short end of the bassinet sheet, enclosing the elastic as I went. Because I stretched the elastic to fit after I reached the other side the elastic was completely enclosed before I was done stitching. Be sure not to catch the elastic with the stitching as you go and stitch to approximately the same spot on the opposite side as the spot you started from. Using the safety-pin to help manuever the elastic, pull the elastic through to the stopping point and stitch it down.
Repeat on the other side and then stitch down the sections on the long ends that didn’t get threaded with elastic. Done!
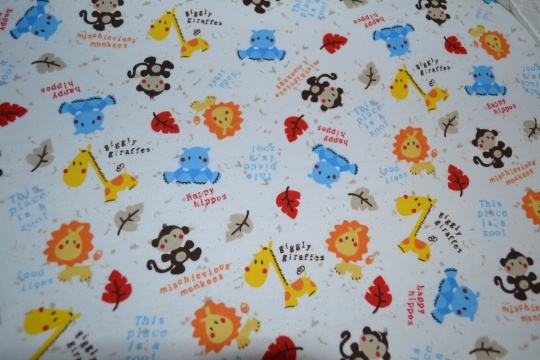
I also made these sheets out of some cute patterned fabric.
Now all I need is a baby to put in this cute bassinet!
A Tightwad-y Little Thing I Did
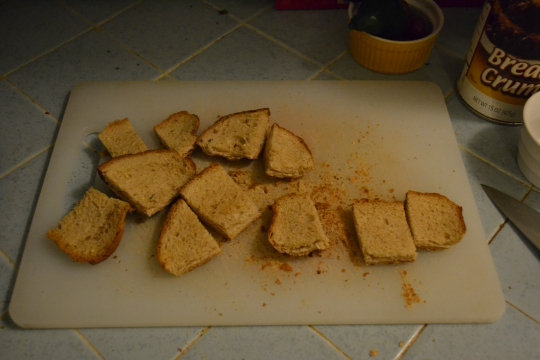
Jason and I both pass over the heel of the loaf of bread when making toast and sandwiches and a couple of months ago I got the idea of saving them in the freezer and turning them into bread crumbs. I was waiting to use up my current jar of bread crumbs before I did it and I finally got around to it the other day. First I toasted the bread slices on a sheet pan in the oven at about 200 degrees.
I had to do a bit of sifting. Some of the chunks wouldn’t get small enough to qualify as bread crumbs so I tossed them out after trying them a few different times through the food processor. I threw away less than 1 slice of bread so I don’t consider it to be that much of a loss.
I like doing little things like this. I don’t use bread crumbs a lot so I hate buying them when a recipe calls for them. The bread was a mixture of whole wheat, rye and sourdough and I think the flavor will be good. I plan to keep these in the freezer so they don’t get rancid.
The opposite of a problem is sometimes still a problem
This time of year women around the world often throw up their hands and say they don’t know what to get the man in their life for Christmas. My husband is the opposite of that. He is interested in so many things that I can’t decide what is the best thing to get him. Especially on a year like this, when we have set a budget of $100 for our holiday spending on each other. I’ve done pretty well so far and I’ve gotten some things I know will be a hit but I still have a bit of money left in the budget and I can’t decide what to buy. Therefore, a fantasy shopping trip with Jason in mind! Here’s a gift guide for a smart, stylish guy.
He loves to try different cheeses and this cute set has a knife for every type. http://www.kikkerland.com/products/cheese-knife-set/
http://www.fredflare.com/gift-guide-FOR-HIM/Graffiti-Cocktail-Shaker/
Lately he’s been drinking tea instead of coffee. http://www.kikkerland.com/products/robot-tea-infuser/
I just think this is so cool.
http://www.fredflare.com/gift-guide-FOR-HIM/Cardboard-Buck-Jr.-Trophy/
 Zara Limited Edition Ankle Boot. I like all the detail and the color here. Jason is very fond of boots, too! http://www.zara.com/webapp/wcs/stores/servlet/product/us/en/zara-us-W2011/130507/474149/%27LIMITED%2BEDITION%27%2BZARA%2BANKLE%2BBOOT
I bought Jason some cashmere blend socks last Christmas and he loves them. These are more colorful and fun. http://www.absolutesocks.com/be-5740olive.html
Jason wears argyle socks a lot and these are very fun. http://www.absolutesocks.com/kb-12116m-bluered.html
Zucchini Quinoa Lasagna
This is from my cousin, Tracy. I love the idea of using the zucchini instead of lasagna noodles and it was really good but my version wasn’t vegetarian because I only had chicken stock on hand so I just went with that.
Ingredients:
4 med zucchini, sliced into 15 strips to fit your baking dish
1 cup quinoa
2 cups veggie stock
1/2 c. tomato sauce
1 small onion
10 basil leaves
2 cups marinara
1 tsp dried oregano
1/2 cup thawed drained chopped spinach
1/4 cup cottage cheese
1/2 cup shredded cheese
Directions:
Preheat oven to 400. Layer sliced zucchini into a colander, sprinkle with salt & layer with paper towels. Combine stock, quinoa, tomato sauce, onion, garlic in sauce pot, bring to a boil and simmer 20 min. Turn off heat, stir in cottage cheese, spinach and basil, season with salt and pepper. Pour marinara in baking dish to coat, layer with zucchini, half of quinoa, zucchini, rest of quinoa & the last of the zucchini. Top with marinara & shredded cheese. Bake for 30 min or until bubbly & zucchini are tender. Set for 5 min and serve.
I used fresh spinach instead of frozen, it wilted just fine when I put it in the hot quinoa mixture. Maybe my basil wasn’t very fresh but I didn’t taste it very much in the dish and I think you could omit it if you don’t have it on hand. It was very delicious and makes quite a large pan, which is a great thing in my house because I like to have leftovers for lunches! I think this might make it into the freezer meal rotation for the baby’s arrival.
This one came from my Aunt Debbie. It was very easy and really delicious.
Ingredients:
2T Olive Oil
2 ribs celery
1 large carrot
1 small red onion
1 red pepper
1 green pepper
2 cloves garlic
1 tsp cumin
1 tsp oregano
1 tsp basil
1 tsp chili powder
4 c low sodium chicken or veg stock
2 15 oz cans black beans
1 15 oz can diced tomatoes
1 cup fresh or frozen corn
salt and pepper
Directions:
In a large skillet, heat olive oil over med heat. Add celery, carrot, onion and bell peppers. Saute unitl onion becomes translucent, abt 8 min. Add garlic and spices. Cook another 2 min.
Add stock or cooking liquid of your choice, beans and tomatoes. Bring mixture to a boil and then reduce heat. Cover and let simmer for about 20 min. Using a hand held blender, puree soup to desired consistency. Add corn and let simmer about 5 min more. Season with salt and pepper, Serve hot.
I omitted the green bell peppers as Jason doesn’t care for them and blended to a chunky rather than completely smooth consistency. I also garnished with a bit of shredded cheese. It was really good and made a good sized batch so I still have leftovers in the fridge.
Once again, too hungry to stop and take pics of this but we ate it all up. The tilapia recipe is from Libby and the bread is from my cousin Mollie.
Tilapia:
Ingredients:
1/2 cup Parmsesan
1/4 c. butter, softened
3 T mayo
2 T lemon juice
1/2 tsp Old Bay Seasoning
1/4 tsp dried basil
4 tilapia fillets
Preheat your oven’s broiler while you mix all ingredients except fish. Arrange fish in a single layer and broil 2-3 min. Flip the fish & broil another 3-5 min. Remove from oven and top with parmesan mixture. Broil 3-5 min until the topping is browned.
I did all of this except officially broiling it. I just baked it on a sheet pan while the bread was baking. It worked fine. The mixture adds a lot of flavor to the fish. I brushed it on thickly and still had a bit leftover that I’m going to try on some chicken.
Birthday Bubble Bread:
Packaged frozen bread dough
1/2 c butter
2 T Italian seasoning (I used a blend of dried basil and oregano)
Leave bread dough out to thaw. Grease bread pan or bunt pan & preheat oven to 375. Soften butter & mix in seasonings. Tear bread dough into pieces & roll in balls. Dip bread balls in the butter mixture and bake in pan. Allow bread to rise for about an hour. Bake until golden brown on top.
I used some pizza dough I had made and had in the freezer. I realize on re-reading this that I made it wrong. I didn’t let it rise for an hour before baking it! It turned out ok but next time I will let it rise.


